How Do I Process a Vendor Invoice and Ready it for Auditing?
After Extraction is complete, the extracted Vendor Invoice will be listed on the Extract - OCR Vendor Invoices index page. When the extraction process results in a fully balanced Extracted Vendor Invoice and all required fields are satisfied, the resulting status will be Ready For Processing*. You may want to review the data you've attached before processing the invoice into the Audit phase.
NOTE: Discovery's Auto Process feature reduces manual input by auto processing extracted invoices that meet the required criteria. Invoices that need review can be processed by resolving any errors and simply clicking the "Save" button.
You can disable this feature in Settings. When Auto Process Extracted Invoices Into Vendor Invoices is turned off, invoices will not be processed until a user clicks the "Process" button.
- Click on Extract.
- Next, you can either:
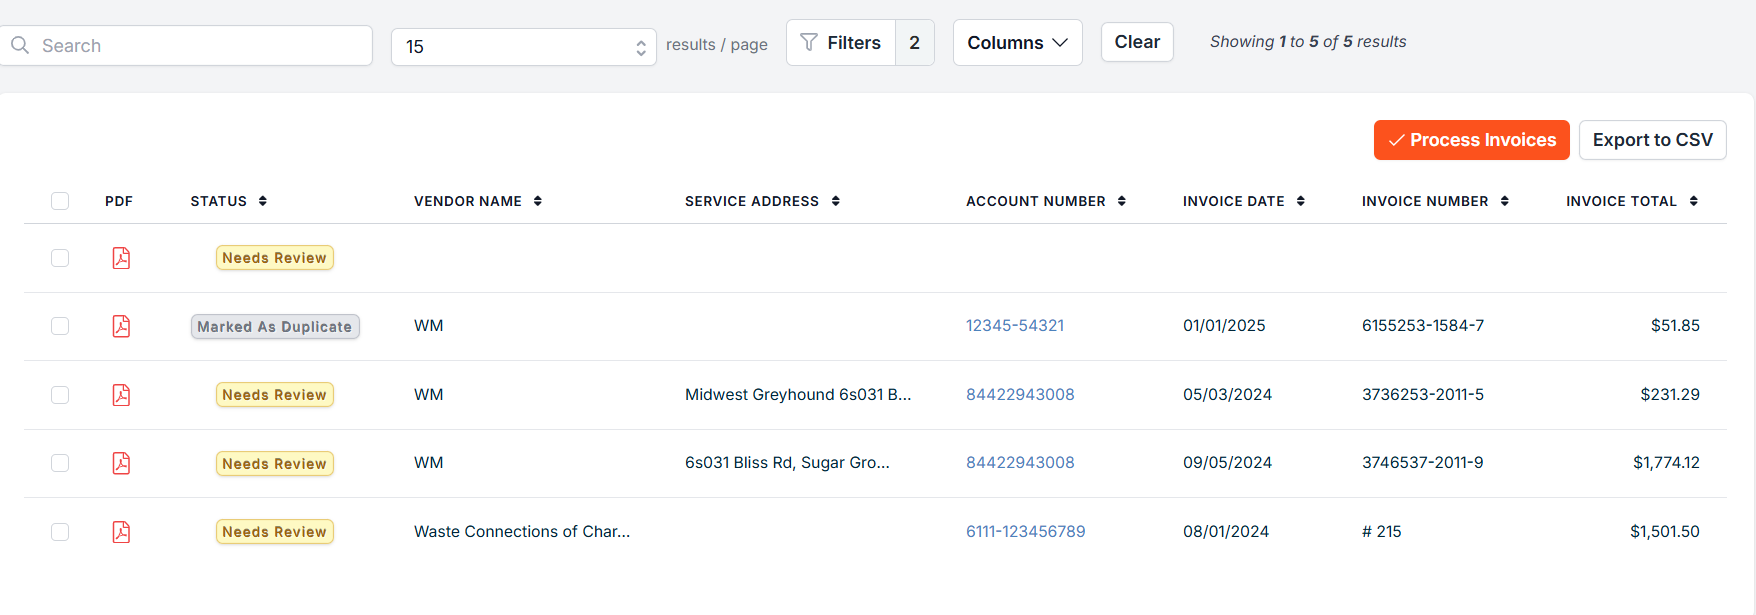
- Click the Process Invoice(s) button on the Extract - OCR Vendor Invoices index page.

or
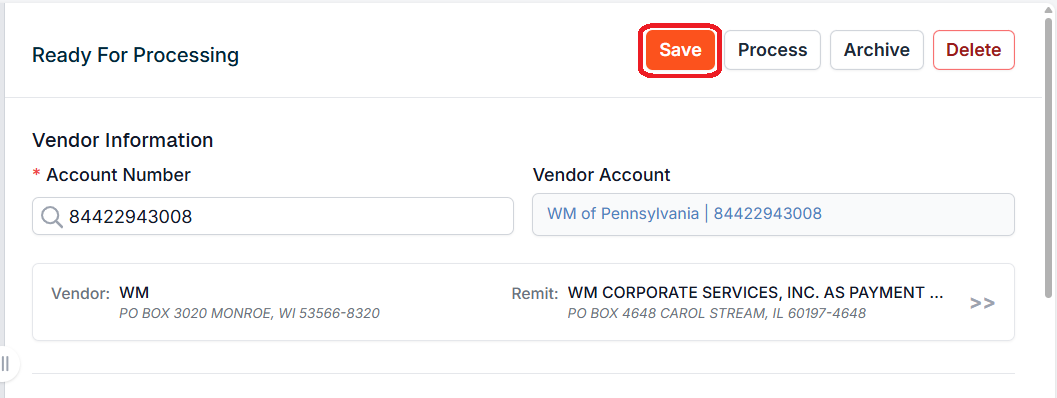
- Edit extracted Vendor Invoice files individually. To do so click on an invoice.
- Then click the Save button at the top of the Edit page.
Invoices that are not yet Ready For Processing cannot be processed due to one or more of the following reasons:
- A matching Vendor Account is not found
- Invoice Total does not reconcile to Line Item Total
- All required Invoice fields are not met
Data extracted from a Vendor Invoice may need adjustment to balance or required data fields that cannot be auto-extracted from the Vendor Invoice. These Extracted Vendor Invoices will have a Status set as Needs Review and will require manual adjustment before they can be progressed to the Audit phase.
Filtering by Error Type: To work through all invoices with the same issue at once, use the error type filters on the Extract index page. Filter by Required Field Missing, Potential Duplicate, Line Item Issue, or Missing Vendor Account to see only the invoices affected by that specific problem.
Whereas we cannot provide real-world instances for every scenario in which an Extracted Vendor Invoice might be prevented from processing, we can illustrate the general approach with one example involving two common issues: a missing required field and an imbalanced line item total. Here's how these are addressed:
- Click on Invoicing.
- Click on Extract.
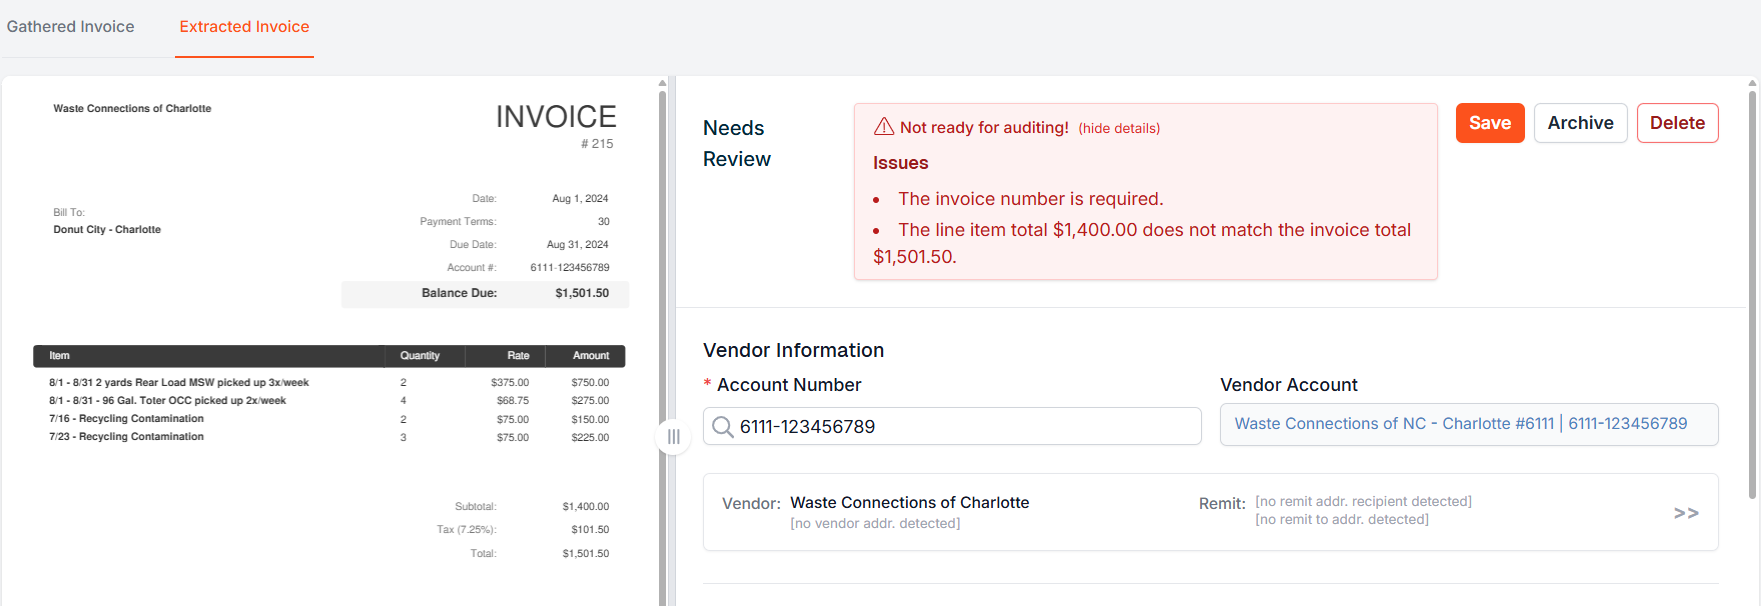
- Once you locate your Extracted Vendor Invoice, click anywhere on the invoice's row to open it.
- In the invoice detail pane on the Extracted Invoice tab, please fill in any missing required fields and correct any line items that need attention. Here, the Issues reported (listed in the pink Issues bar above the invoice and indicated in red text below) are an Invoice Number that failed to extract and we have an imbalance in our Line Item total.
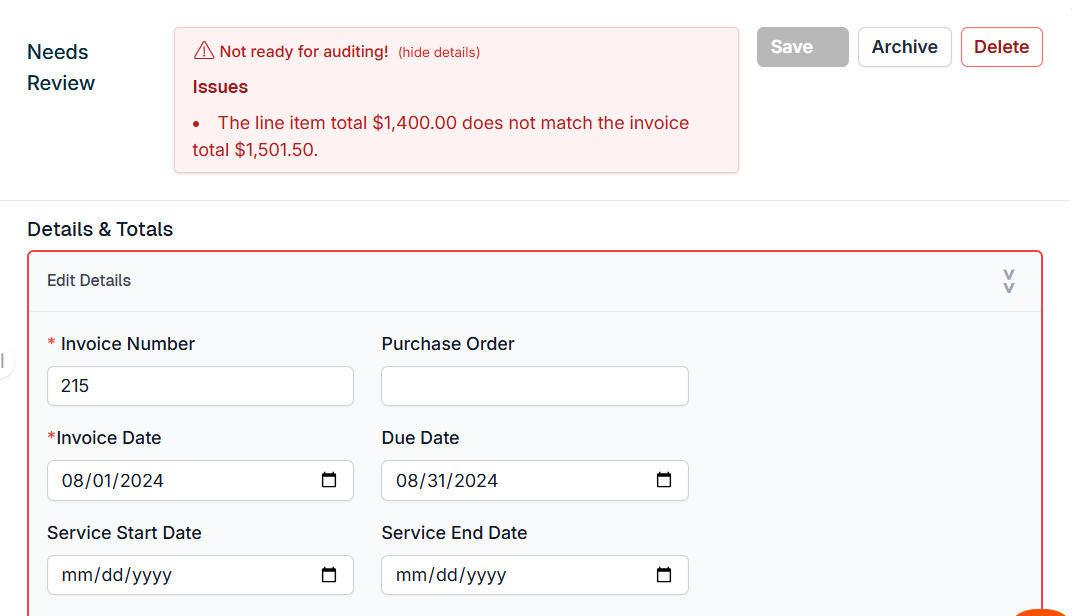
- Entering the missing Invoice Number under Details and Totals and then clicking the orange Save button clears out the missing Invoice Number issue.
- Discovery is reporting that the line item total of $1,400.00 does not match the invoice total $1,501.50. This typically means one or more of the following:
- Invoice Total was incorrectly extracted.
- Line Item(s) was included that should not have been.
- Line Item(s) was not included that should have been.
- Line Item amount(s) was incorrectly extracted.
- To begin, we recommend ensuring the Invoice Total amount was extracted correctly. It was correct at $1,501.50.
- Next, determine the amount of imbalance you are seeking to identify. Here, it is $101.50 as shown in red text at the bottom of the invoice.
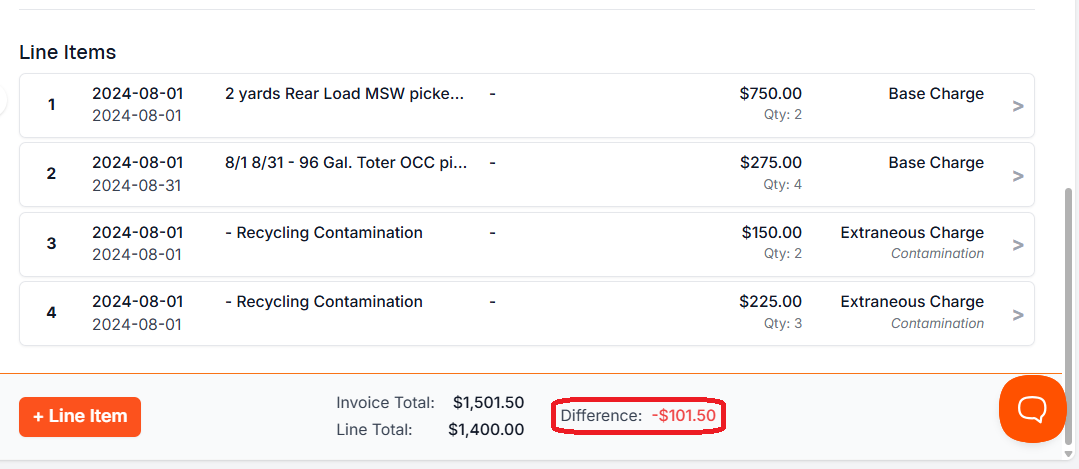
- The last line item on the invoice is a sales tax line item with an amount of $101.50. This line item was missed in the extraction step and needs to be added.
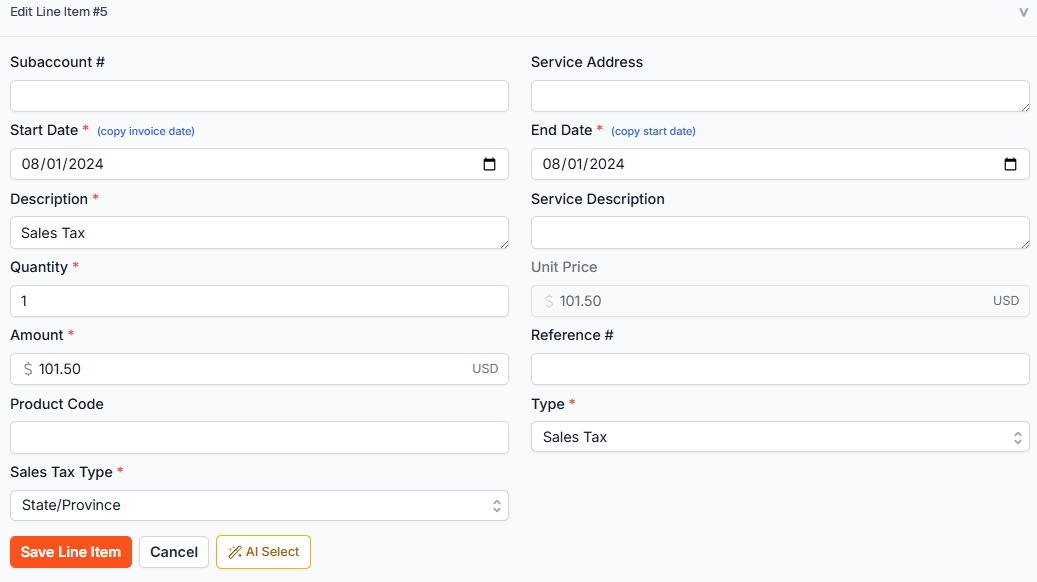
To add a new line item, click on the orange + Line Item button at the bottom of the page.

- In the Edit Line Item lightbox window that appears, fill in the required line item information information:
- Start Date
- End Date
- Description
- Quantity
- Amount
- Type - in this case, select Sales Tax.
- Subtype - This may vary depending on the selected Type.
Click the Save Line Item button.
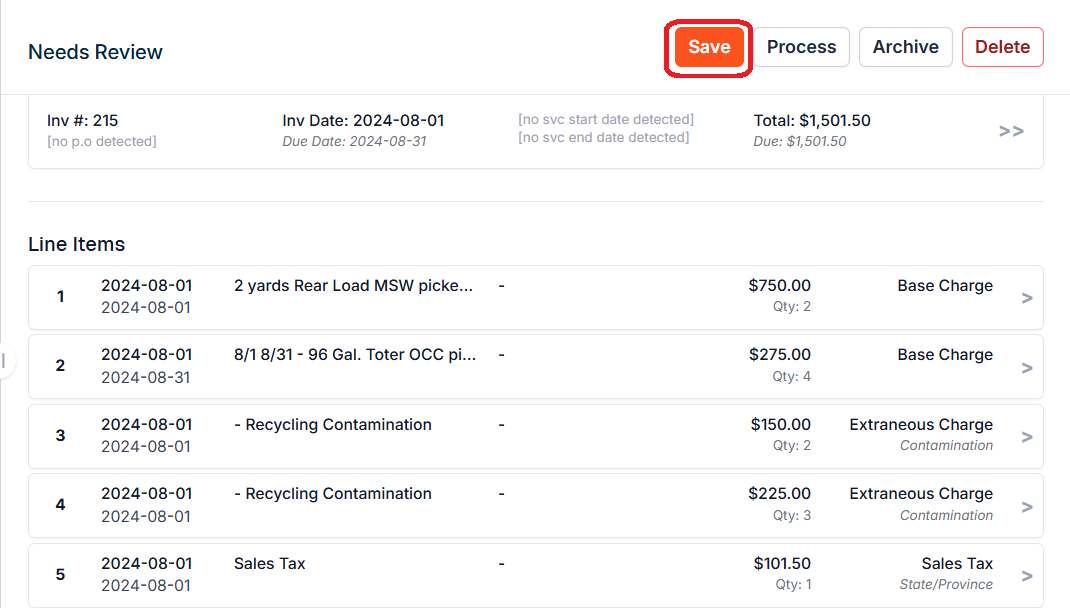
- With that Line Item classified as Sales Tax, the resulting Line Item total is now $1,501.50.
- To edit any additional line items, simply click on the line item to open it. In the Edit Line Item lightbox window that appears, modify the necessary fields and hit the Save Line Item button.
- When you are finished editing the extracted invoice, click on Save in the top right corner to process the invoice.
Using AI Select to Add/Edit Line Items
Our AI Select tool harnesses the power of AI to cut down on manual input of line item data. Use it to enter new line items or edit existing ones.

Learn more in this video.
Here is a step-by-step demo of the AI Select tool.
- On the Extracted Invoice edit page, click the orange "+ Line Item" button.

- Next, click the "AI Select" button at the bottom.

- On the PDF, highlight the line item you wish to extract.

- Once you have finished highlighting the line item, click "Select with AI."

- The data you selected will now be extracted from the PDF and appear as a new line item.

Do Not Process (After Vendor Invoice Created)
If an extracted invoice has already been processed into a Vendor Invoice but should not have been, you can still flag it as "Do Not Process" from the Extracted Invoice detail page.
Triggering this action will:
- Delete the associated Vendor Invoice — permanently removing it from the audit queue
- Set the Extracted Invoice status to "Do Not Process" — preventing it from being re-processed individually or via bulk processing
Before the deletion completes, a confirmation warning will appear, since deleting a Vendor Invoice cannot be undone.
Note: This action is only available when the Vendor Invoice is in a writable state. Invoices that have already been approved cannot be deleted this way. The Extracted Invoice record and any associated Gathered Invoice File are not affected.
* If the Prevent Vendor Invoice Processing toggle is turned on for a vendor account, extracted invoices will stop at a status of Done instead of moving to Processing Complete, and a Vendor Invoice will not be generated.

If you have additional questions or need more in depth information, please feel free to send us a message using the help beacon in the lower right-hand corner.